
Learning how to organize your work with Notion is less about mastering every feature and more about building three simple pieces first: a task list, a project database, and a home dashboard that ties them together. Everything else can be added later.
Table of Contents
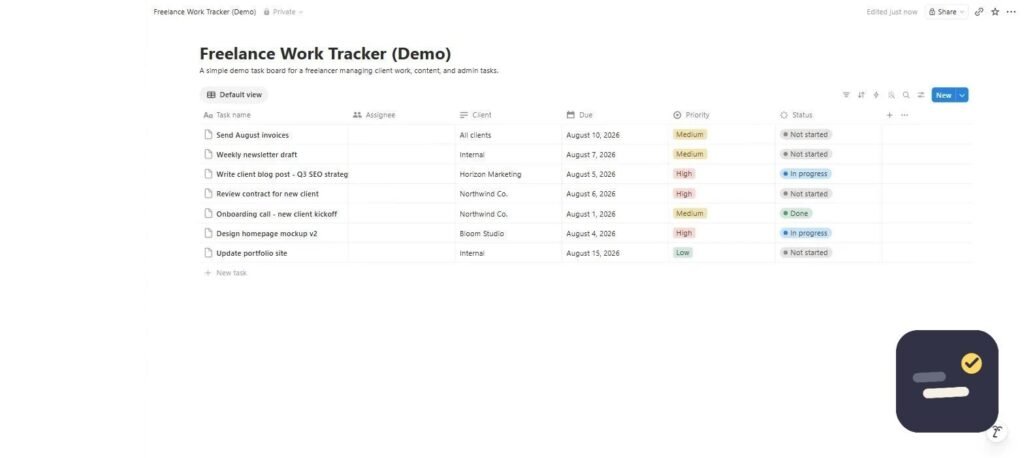
Step 1: Start With One Task Database
Resist the urge to build a complex system on day one. Create a single database with columns for Task, Status, Due Date, and Priority. Use the Board view to see tasks by status (To Do, In Progress, Done) the way you would on a Kanban board. This alone replaces most sticky-note and spreadsheet task tracking.
The detail that trips up most beginners is the Status property. Notion has two similar-looking options: Select, which is just a colored label, and Status, which groups its options into To-do, In Progress, and Complete. Only the Status type gives you the automatic grouping that makes Board view useful, and it is the one Notion suggests by default. If your board later refuses to group the way you expect, this is almost always why.
Add views rather than databases. The same task database can show a Table view for bulk edits, a Board view for daily work, and a Calendar view driven by the Due Date property — all pointing at one set of data. People who build three separate databases for the same tasks end up maintaining three lists that quietly drift apart.
Step 2: Add a Projects Database
Once you have more than a handful of tasks, group them under projects. Create a second database for Projects, then link your Tasks database to it using a Relation property. This lets you see every task under a given project in one place, and every project’s overall status at a glance.
A Relation creates a two-way link: add the relation on Tasks and Notion offers to show the matching property on Projects automatically. Leave that turned on. Without it you can see which project a task belongs to, but not which tasks belong to a project — which is the half you actually open the Projects page to see.
The companion property worth learning early is Rollup. A rollup reaches through a relation and summarizes the linked records: count of tasks, percentage complete, the earliest due date across a project. One rollup showing “percent of tasks done” turns a Projects table from a list of names into something you can actually read status from.
Step 3: Build a Home Dashboard
Create one page that acts as your daily landing spot — a filtered view of tasks due today or this week, a linked view of active projects, and a quick-add button for new tasks. This becomes the single page you open every morning instead of hunting through your workspace.
Build it with linked views, not new databases. Type /linked on the page and point it at your existing Tasks database, then filter that view down to Due Date is on or before today and Status is not Complete. The data lives in one place; the dashboard is only a window onto it.
Keep the dashboard short enough to read without scrolling. Three blocks is usually the right number: what is due now, what is in flight, and one quick-capture button. A dashboard that shows everything is the same as a dashboard that shows nothing — you stop reading it within a week.
Step 4: Use Templates for Recurring Work
If you run the same type of project repeatedly (client onboarding, weekly reports, content production), build a template once inside your Projects database. New instances of that recurring work start with the right structure already in place instead of being rebuilt from scratch each time.
These are database templates, not page duplicates: open the database, click the arrow beside the blue New button, and choose New template. Whatever you put inside — a checklist, headings, pre-filled properties — becomes the starting point every time someone creates a record from that template. You can set one as the default so the plain New button uses it automatically.
The test for whether something deserves a template is simple: if you have rebuilt the same page structure three times, you have already spent longer than making the template would have taken. If you are moving a whole system rather than one page, I duplicated my own four-database setup and wrote up what actually breaks when you duplicate a Notion template, including the two failures nobody warns about.
Step 5: Organize Your Work With Notion AI
Notion AI is far more useful once you have a real structure of docs and databases for it to search across and summarize — using it on an empty or disorganized workspace wastes most of its value. Once your task and project databases are running, Notion AI’s cross-workspace Q&A becomes genuinely powerful for finding decisions and context fast.
The order matters more than it sounds. AI answers are only as good as what it can read, so a workspace of three scattered pages gives it nothing to work with. Structure first, AI second — not the other way around.
The Four Property Types That Do Most of the Work
Notion offers more than twenty property types, but a working task-and-project setup runs on four of them. Learning these four is the difference between a system that answers questions and a list you have to read manually.
| Property | What it does | Where you need it |
|---|---|---|
| Status | Groups options into To-do / In Progress / Complete | Tasks — makes Board view group correctly |
| Date | Stores a due date or a date range | Tasks — powers Calendar view and “due this week” filters |
| Relation | Links a record in one database to records in another | Connecting Tasks to Projects |
| Rollup | Summarizes the records reached through a relation | Projects — percent complete, task count, next deadline |
Everything else — Select, Multi-select, Person, Files, Formula — is worth adding only when you hit a question your current properties cannot answer.
How Long This Actually Takes
Setting expectations honestly matters here, because most Notion tutorials show a finished workspace and skip how long it took to get there. Building this in one sitting is possible; building it well usually is not.
| Stage | Realistic time | What you should have at the end |
|---|---|---|
| Task database | 20–30 minutes | One database, three views, tasks actually entered |
| Projects database + relation | 30–45 minutes | Projects linked to tasks, one rollup working |
| Home dashboard | 30 minutes | A single page you would genuinely open first thing |
| Templates | 15 minutes per template | One recurring workflow that starts pre-structured |
| Living with it | 2–3 weeks | Enough real use to know what is missing |
The last row is the one people skip. A system judged on the day you build it always looks good; the useful verdict comes after two weeks of actually putting work into it.
Five Mistakes That Break Notion Systems
These are the failure patterns that show up again and again in abandoned workspaces — and most of them come from building too much, too early.
- Copying a complex template on day one. Someone else’s system encodes their workflow. You inherit their assumptions without understanding any of them, and the first thing that does not fit stops you dead.
- Making a database per project. Twelve databases cannot be filtered, sorted, or rolled up together. One database with a Project relation can.
- Using Select where Status belongs. The board never groups properly, and rebuilding the property later means re-tagging every existing task.
- Building for a team you do not have yet. Assignee fields, approval stages, and permission structures add friction now for a scenario that may never arrive.
- Never deleting anything. Completed tasks left in the default view make the system feel heavier every week. Filter them out rather than archiving them by hand.
What the Free Plan Actually Limits
For one person building the setup described here, the free plan is not the constraint people expect. Personal use gets unlimited pages and blocks, unlimited databases, and all the view types — Table, Board, Calendar, Timeline, Gallery. The limits that bite are elsewhere: file uploads are capped at 5 MB each, page history is kept for seven days, and guests you share with are limited in number.
The genuine paid trigger is collaboration, not capability. The moment several people need to edit the same workspace with real permissions, you are looking at a per-seat cost. Notion AI is billed separately again, on top of whichever plan you are on — which is another reason to treat it as step five rather than step one.
When Notion Is the Wrong Tool
Notion rewards people who enjoy shaping their own system. If that sounds like overhead rather than appeal, a tool with opinions built in will serve you better — something like Todoist for pure task capture, or Trello if a board is genuinely all you need. Notion asks you to make decisions that those tools have already made for you. I went through the free plan in detail in my Trello review.
It is also a poor fit for anything requiring hard-edged project management: dependency chains, resource leveling, or critical-path scheduling. Notion’s Timeline view looks like a Gantt chart but does not enforce the logic behind one. And for teams where several people edit the same records constantly, purpose-built tools handle the conflict resolution more gracefully.
Frequently Asked Questions
Is Notion good for beginners?
Yes, if you start simple. A single task database with a Board view is enough to get real value before exploring more advanced features like relations and templates.
How do I link tasks to projects in Notion?
Use a Relation property on your Tasks database pointing to your Projects database. This lets each task belong to a project and lets each project show all its linked tasks.
Should I use a Notion template instead of building my own system?
Templates can save setup time, but building your own simple system first helps you understand how the pieces connect, which makes customizing any template later much easier.
How long does it take to set up a Notion workspace?
Around two hours of building gets you a task database, a linked projects database, a dashboard, and one template. Expect another two to three weeks of daily use before you know what is actually missing.
What is the difference between a Relation and a Rollup in Notion?
A Relation links records in two databases together. A Rollup reaches through that link and summarizes what it finds — a count of tasks, a percentage complete, or the earliest due date. You need the Relation first; the Rollup is what makes it readable.
Is the free Notion plan enough for personal use?
Yes. Personal use includes unlimited pages, unlimited databases, and every view type. The limits are 5 MB per file upload, seven days of page history, and a cap on guests — none of which affect a solo task-and-project setup. Paid plans are about collaboration, and Notion AI is billed separately again.
If you want to see how other teams structure their Notion setups before building your own, the official Notion template gallery is a useful reference point. However you organize your work with Notion, resist copying a complex template wholesale on day one — start with your own simple version first, then borrow specific pieces from templates once you know exactly what you’re missing.

Written by Ivan T.
Founder of StackToolsHQ. Writes hands-on reviews and comparisons of productivity and AI tools for freelancers, small teams, and remote workers. More about this site.
One last practical note: revisit your setup every few weeks, not just once. As your workload changes, the way you organize your work with Notion should change with it — a system that fits five active projects often needs simplifying once you’re down to two, and vice versa. Treat the structure as a living tool, not a one-time setup task.